This is a Git intro article aimed at tech newbies.
This article mainly introduces basic concepts of the version control tool Git,
along with a few basic commands: init, status, add, commit, reset, log.
What is Git
Over ten years ago, there were many programmers developing the Linux system together.
With so many people writing a single piece of software, they needed a good tool to
control code versions / roll back code / develop in parallel.
At first they used an existing software called BitKeeper,
but later BitKeeper actually wanted to charge money! So they developed Git…
That’s right, Git is written by programmers themselves,
written for programmers’ own use, a tool for managing code writing.
What this article wants to do is introduce this programmer-used tool Git
to classmates who don’t know how to write code but need to write and modify documents.
(So the concrete examples in this article are done on the Windows system.)
What is Version Control
Let’s give an example:
Today I’m writing my graduation thesis. I opened Microsoft Word, and finished writing chapter one.
But suddenly I have a better idea, I decide to rewrite chapter one.
So I pressed the Undo button, and the Word document rolled back to the very beginning.
I sat for three minutes, and I realized the chapter one I wrote before was actually better.
So I pressed the Redo button, and the Word document rolled back to when I had finished writing chapter one.
The example above is actually a typical version control scenario.
And Git as a version control tool does file-level version control.
Next we’ll try Git directly.
Installing Git
First we go to Git’s official website (English)
to download the latest windows version of git.
(When you open this website in a browser, a download dialog should pop up.)
Download URL: https://git-scm.com/download/win
After downloading, open it. Most settings can use defaults.
A few key options are shown below:
Installation options: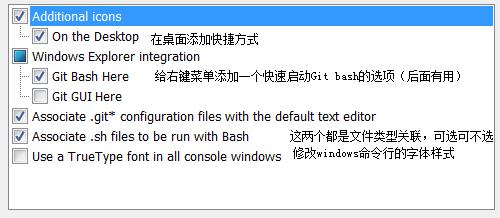
Installation commands: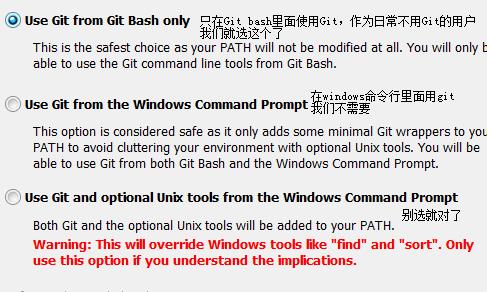
Line ending operations: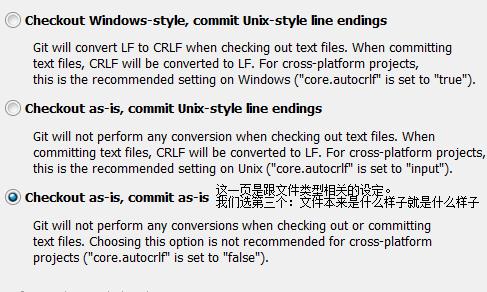
After installation we right-click in any menu,
and we should see the “Git Bash Here” option.
And after opening it we type git version
to view git version information.
This means we’ve installed successfully.
$ git version
git version 2.9.0.windows.1
(The specific version may change over time, but it doesn't matter)
Getting Started
Open Git Bash
Git is a command-line tool.
(Though it also has a graphical interface, that one is too dumb—
we’d better learn the more usable command typing.)
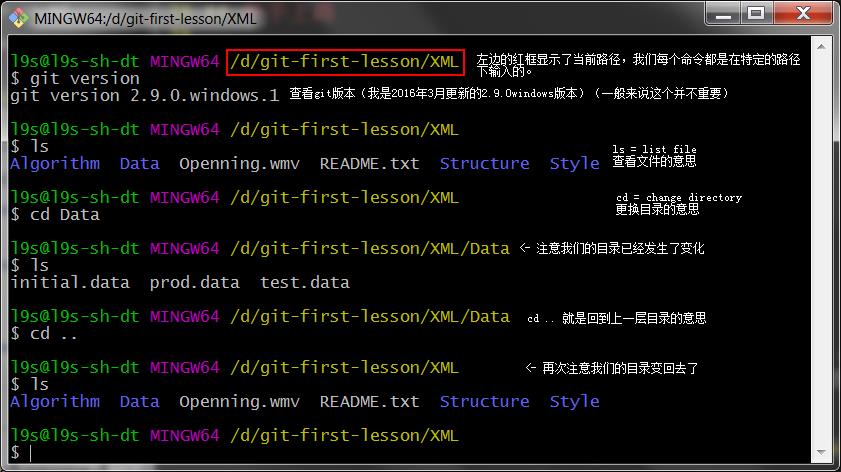
First we open a folder,
for example I opened the folder D:\git-first-lesson\XML,
then right-click menu -> Git Bash Here,
and a Git Bash like this opens:
Let me also mention a few basic commands:
ls: short for list, you can see what files (folders) are in the current foldercd: ChangeDirectory, you can change directory.cd ..goes back to the parent directory
Git Directory
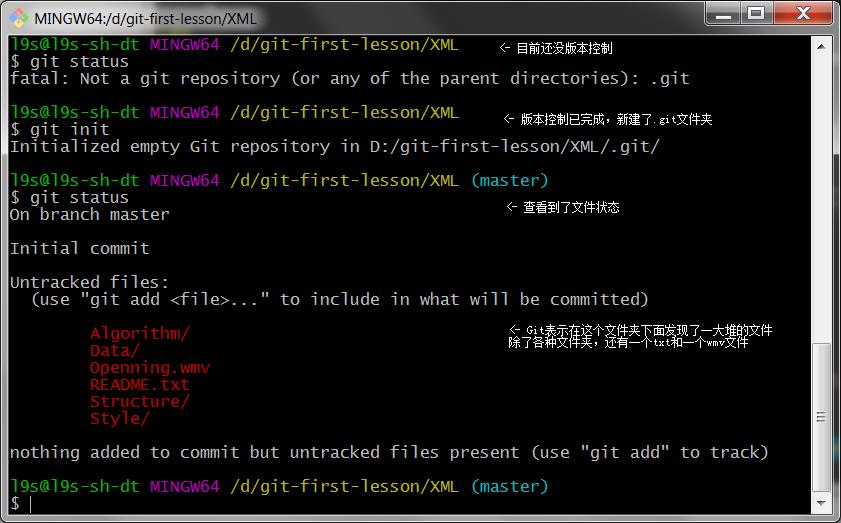
To see the status of a directory, use the git status command.
We can try running this command, but Git will give this error:
$ git status
fatal: Not a git repository (or any of the parent directories): .git
The literal meaning of this error is “error: you have not put the current directory (or any parent directory) under git version control”.
So to put a folder under version control, we use the git init command:
$ git init
Initialized empty Git repository in D:/git-first-lesson/XML/.git/
The hint message indicates git has finished initializing.
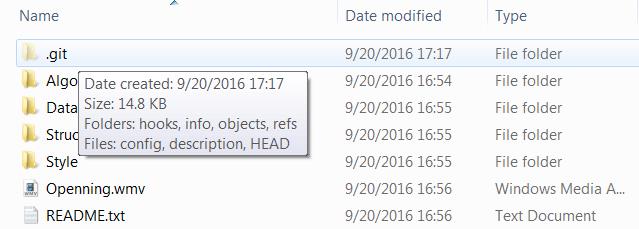
This process actually creates a .git folder in the current directory:
Then we run git status again and we can see the current directory status:
Control Files
After we initialize git, by default git will find all files for us.
But what if we don’t want to modify .wmv audio files, .bak backup files, the Data data folder?
Or what if we only want to version control .xml files?
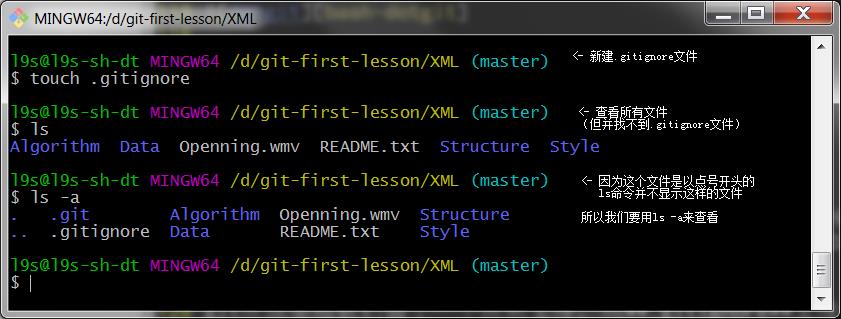
Git leaves us a control file here, called .gitignore.
We can right-click -> new text file -> rename to .gitignore or directly run touch .gitignore in git-bash:
If we want to ignore wmv files, bak files and the Data folder, we modify .gitignore content to:
*.wmv
*.bak
Data\
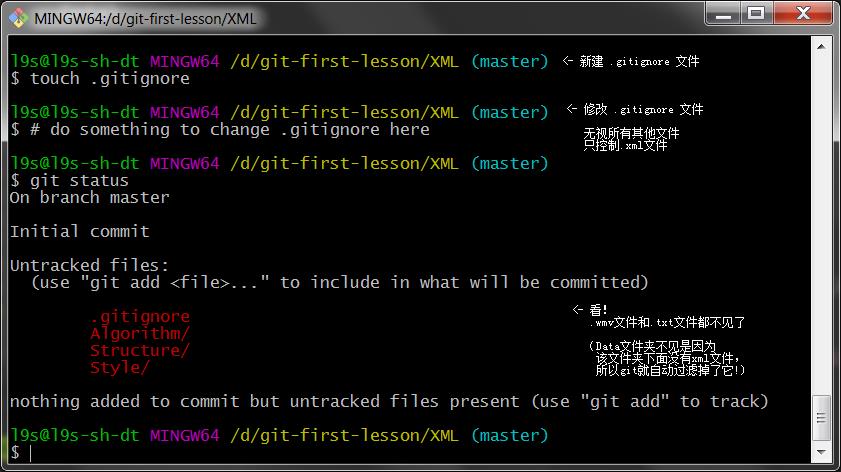
If we only want to control xml files, we can modify it to:
*
!*/
!.gitignore
!*.xml
Then we can run git status again to view folder status:
(In this example my .gitignore only controls xml files)
Setting / Viewing Breakpoints
The most exciting part of Git arrives:
With the preparation above,
we can now set breakpoints,
and roll back to any breakpoint at any time in the future!
Let’s directly look at how to set breakpoints (Commit):
- Use
git add .to record changes in the current directory. - Use
git commit -m <commit_message>to set a breakpoint.
For example we type git add . and git commit -m "My First Commit":
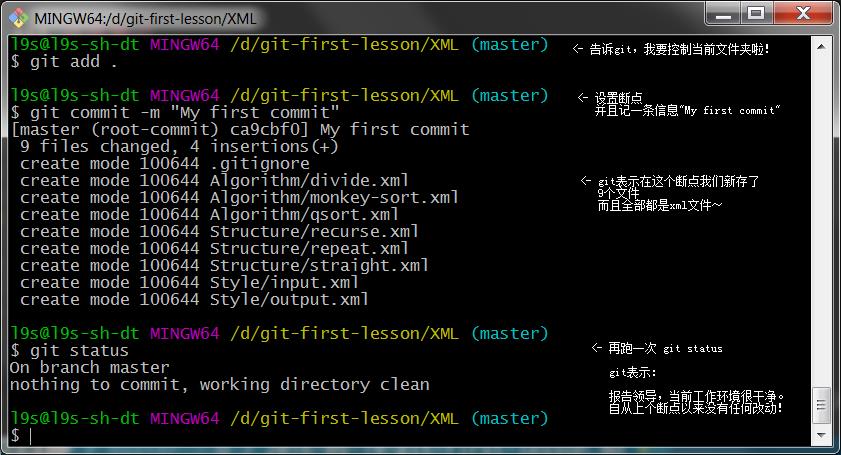
Great! Breakpoint set! Next we can view the breakpoint we set:
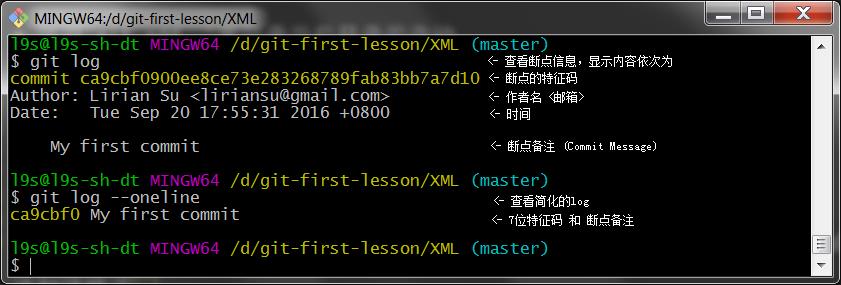
We can use git log to view breakpoints, or git log --oneline to view summary info about breakpoints.
Like this:
Viewing Modifications and Rolling Back
So far, the operations we’ve done don’t modify the current folder.
We’ve just put the entire folder’s current state under version control.
Next we’ll modify files.
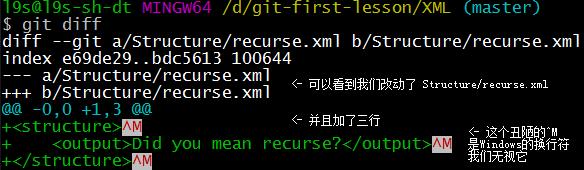
For example let’s make a small change to the file Struture\recurse.xml.
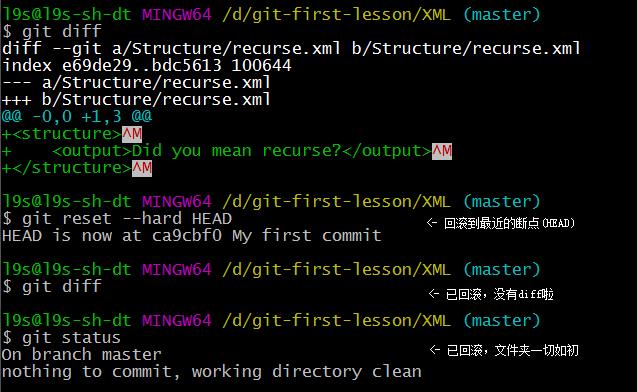
Use git diff to see the difference between the current text and the previous version.
Use git reset --hard HEAD to go back to the previous breakpoint.
Summary
In this beginner’s tutorial, we briefly introduced version control and Git.
After installing Git, we encountered the following commands:
| Command | Description |
|---|---|
git version | Show Git version |
ls | List files in current folder |
cd data | Change directory (enter data directory) |
cd .. | Go back to parent directory |
git status | Check Git status |
git init | Initialize (put current folder under version control) |
touch .gitignore | Create .gitignore file |
git add . | Add all non-ignored files to version control |
git commit -m "My first commit" | Set breakpoint (more accurately, generate a commit) (commit) |
git log | View history |
git log --oneline | View simple history |
git diff | View difference between current folder state and nearest breakpoint |
git reset --hard HEAD | Roll back to the previous breakpoint |
In future tutorials, we’ll dive deeper into Git.
(End)